The Internet has run out of unused IPv4 addresses. Some regions of the world still have some local supply left but it is a matter of time until those supplies run out as well. IPv6 is the protocol designed to solve the address shortage and to eventually replace IPv4. Until that happens IPv4 and IPv6 will be used side by side because many existing systems still need IPv4 to function.
IPv4 is currently still needed but there are not enough IPv4 addresses. That means that to be able to use IPv4 the addresses have to be shared with NAT. When providing content to the Internet the use of NAT by the internet service provider on the side of the user can have a negative impact.
This document shows how to IPv6-enable content to avoid or mitigate that impact.
1. Introduction
Content providers currently can use the IPv4 addresses of their audience for several purposes, including:
- Geo-location
- Analyzing visitor behaviour
- Access control
- Security / auditing
- Rate limiting
When internet service providers use more and more IPv4 NAT, which is inevitable, the content provider loses such functionality. In addition to this it makes the visitor’s experience dependent on the quality, capacity and availability of the service provider’s NAT devices.
When content providers make their content available over both IPv4 and IPv6 these problems can be mitigated. Modern web browsers choose the protocol that works best for the user, so having two protocols available increases the likelihood of a good user experience. There is usually also a preference for IPv6 over IPv4. When offering both protocols the user will start using IPv6 when possible, which avoids the drawbacks mentioned about IPv4 NAT.
The downside of supporting two protocols is that it does require some extra effort, but when using the right tools this is not as hard as it might seem. If the service provider of the content provider provides these tools it is hardly any effort at all.
2. Overview of possible solutions
2.1 Native IPv6
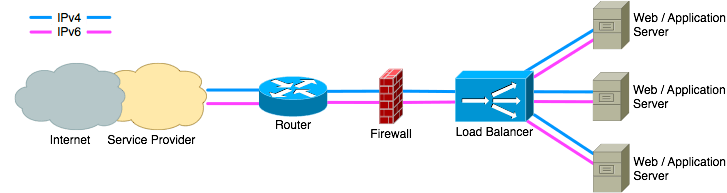
Supporting IPv6 natively everywhere is the preferred option. It avoids any complications caused by translations and it provides the most information to the server. It does mean that every device along the path to the server must handle IPv6 traffic. This includes routers, firewalls, load balancers and of course the server itself.

If all devices support IPv6 then this is the preferred option. If not all devices are IPv6 compatible then the best way forward is to choose one of the other solutions for now and to make sure that when replacing that device it is replaced by an IPv6 compatible one . The public RIPE-554 document provides guidelines for buying IPv6 compatible equipment.
More detailed information on how to implement this see section 3 and section 4.
2.2. Letting the load balancer handle it
When it is not possible to implement native IPv6 everywhere then another approach has to be found. If the only parts of the infrastructure that does not support IPv6 are the servers or the applications on the servers then most IPv6 compatible load balancers can be configured in such a way that incoming requests over IPv6 are sent to the servers over IPv4.
2.3. IPv6-to-IPv4 proxy
One option is to implement a reverse proxy server that acts like an IPv6 server on one side and an IPv4 client on the other. It can then proxy the request from IPv6 clients to the IPv4 servers. The placement of the proxy server depends on which part of the network can support IPv6. If the load balancer is the only device that is not compatible with IPv6 then the proxy server is best placed between the firewall and the load balancer.


If the firewall is not IPv6 compatible then the proxy server can be placed in front of the firewall. This does require extra attention to the protection of the proxy server as it can no longer benefit from the protection of the firewall.

More detailed information and examples of how this can be implemented see section 3 and section 5.
There is always the option of asking the service provider to provide the proxy server. This doesn’t require any changes to the local infrastructure and is a very quick way to make content reachable over IPv6. Hosting your own reverse proxy server in an external datacenter is also an option.
2.3.1. Protocol level choice
The proxy server can be implemented on layer 4 (TCP) or layer 7 (HTTP/HTTPS). Each has its own benefits and drawbacks.
2.3.2 IPv6-to-IPv4 proxy on layer 4
Translating on layer 4 is the easiest to configure. The only information needed is the IPv6 address and port number to listen on and the IPv4 address and port number to forward traffic to. The content of the traffic is passed transparently, so this works independent of the application protocol. When multiple websites are hosted on a single IPv4 address the proxy can handle all of them at once without any additional configuration.
The downside is that this method can therefore also not include any useful information in the protocol. All requests from IPv6 clients arrive from the IPv4 address of the proxy server. The layer 4 proxy server has no way to inform the server what the address of the real client is.
This method can therefore not mitigate the loss of information that IPv4 NAT at the client’s service provider causes. It is however much still easier to provide good performance and reliability as there is no dependency on third-party NAT implementations.
2.3.3. IPv6-to-IPv4 proxy on layer 7
Translating on layer 7 provides more features but is also harder to configure. The proxy has to know which application protocol is being used and has to be configured accordingly. If the proxy service is for HTTPS websites then the proxy server needs the private keys and certificates for those websites. This requires extra maintenance when a key rollover takes place or when certificates expire. It might also be a concern when the proxy server is provided by the service provider.
The benefit of this method is that the proxy server can include additional information in the request, such as an X-Forwarded-For HTTP header which shows the IPv6 address of the client. With this information the loss of information caused by IPv4 NAT can be mitigated.
2.4. NAT64
Another possible method is to implement NAT64 gateways. These are very similar to an IPv6-to-IPv4 proxy on layer 4 in that they are independent of the application protocol being used. However, instead of accepting an IPv6 TCP connection from a client and creating a new IPv4 TCP connection to the server the NAT64 gateway translates the IPv6 TCP connection directly into an IPv4 connection.
More detailed information and examples of how this can be implemented see section 3 and section 6.
While this seems more efficient it has a drawback. When translating the IPv4 response packets coming from the server into IPv6 packets for the client there is a problem: an IPv6 header is 20 bytes larger than an IPv4 header. A maximum-size IPv4 packet will result in a too large IPv6 packet. This means that the IPv6 packet has to be fragmented. Although this completely conforms to the specifications, experience has shown that many currently deployed IPv6 systems have problems handling these fragments. To avoid these problems the server must therefore be configured to send response packets with a smaller maximum size.
2.4.1. MTU problems
Because the standard ethernet MTU (Maximum Transmission Unit, the maximum packet size) is 1500 bytes the maximum reply packet size from the server must be 1480 bytes long, leaving 20 bytes available for replacing the IPv4 header with an IPv6 header.


However, when one connection somewhere between the client and the server has an MTU which is smaller than 1500 then fragmentation is needed again. Such smaller MTUs are common on for example IPv6 tunnels and DSL connections. The IPv6 standards dictate that every link must support an MTU of at least 1280 bytes. If the server is configured to never send IPv4 reply packets larger than 1260 bytes then the IPv6 packets sent by the NAT64 gateway will not be larger than 1280 bytes, which must be supported everywhere without fragmentation.
2.4.2. Places where a NAT64 gateway can be deployed

As with the proxy solution there are several possible places to deploy a NAT64 gateway. Some firewalls provide NAT64 as a feature. If such a firewall is already deployed this can be the best place to do the translation.


Placing the NAT64 device just before the load balancer makes sure that the firewall can protect the device and it provides maximum flexibility for firewall policy configuration.


If the firewall does not support IPv6 then the NAT64 device can be placed outside the firewall. As with deploying a proxy server outside the firewall this setup requires extra attention to securing the NAT64 device.

Of course the service provider might provide NAT64 services to its customers. If the service provider does not offer this as a service it is also possible to run a NAT64 gateway in an external datacenter yourself. That way no part of the internal network has to be IPv6 enabled.


3. Implementing IPv6, generic steps
3.1. Equipment
When implementing IPv6 it is important to verify that all equipment in the network between the internet connection and the device that will handle or translate the IPv6 traffic is compatible with IPv6. The public RIPE-554 document provides a list of features that are important to support when implementing IPv6 and it provides guidelines for buying IPv6 compatible equipment.
3.2. Software
It is also important to verify that all software that deals with IP addresses is compatible with IPv6. This includes operating systems, server applications and supporting applications such as log file analysers, security tools, management tools etc. This is of course only relevant in case those systems see IPv6 addresses, for example in a log file or in an X-Forwarded-For HTTP header.
3.3. Education
While IPv4 and IPv6 are similar in many respects there are also many differences. The most noticeable ones are about addresses. IPv6 has much longer addresses than IPv4 and provides a lot more flexibility to the network administrator. To be able to deal with this flexibility the network administrator should have a good understanding of how IPv6 works.
3.4. Addressing plan
When implementing IPv6 in your own network you will need IPv6 addresses and an IPv6 connection to the internet. Usually your ISP can provide you with both. When you get your IPv6 address assignment it will usually be a /48 sized address block. This means that you have 65.536 subnets available, with an almost unlimited number of IPv6 addresses per subnet. Making an addressing plan for your network is important for a structured and manageable deployment. SURFnet, the Dutch National Research and Education Network, has written a manual on how such an IPv6 addressing plan can be written.
3.5. Experiment
Before deploying IPv6 on your production network it is a good idea to build a lab environment to test and experiment with IPv6. Make sure that you are comfortable with running an IPv6 network.
3.6 Monitoring
Make sure to include monitoring the IPv6 working, reachability and performance of your service in the same way as you monitor IPv4. Ultimately the client application chooses to use either IPv4 or IPv6. When one of the protocols breaks your users will be affected. IPv6 reliability is as critical as IPv4 reliability to the experience of your users.
3.7. DNS
When the service is reachable over IPv6 that reachability should be advertised in DNS. That way the user’s systems know that it can reach the service over IPv6 and will start to use it. As long as the IPv6 address of the service is not advertised your users will not know about it, which can be very useful when testing the IPv6 deployment.
Advertising IPv6 addresses in DNS is done with an AAAA record. If your service is called www.example.com and its IPv4 address is 192.0.2.80 then the existing DNS record will look like:www.example.com. IN A 192.0.2.80
If its IPv6 address is 2001:db8:abc:123::80 then include the following DNS record next to the existing A record:www.example.com. IN AAAA 2001:db8:abc:123::80
Clients now will see both the A record for IPv4 and the AAAA record for IPv6 and they now know that they can use both protocols to reach the service.
4. Implementing native IPv6
4.1. Preparation
When implementing IPv6 natively in your network it is important to verify that all equipment in the network path between the internet connection and the servers is compatible with IPv6. Please refer to section 3 for advise on how to do this.
4.2. Implementation
When implementing IPv6 natively the implementation should follow the structure of the IPv4 network. This makes IPv6 easier for the network administrators to understand the topology, which makes the management of the network less error prone. And when a failure occurs it makes it much easier to find the cause.
The same goes for firewall policies and load balancer configuration. Remember that your users will use both protocols so make sure that the service behaves identically over both. Your user shouldn’t even notice which protocol is being used. That technical detail is irrelevant for the user’s experience.
4.3. Benefits and drawbacks of this solution
The benefit of this solution is that you are now completely prepared for the current and future internet. You offer both protocols to your users, all your systems can deal with IPv6 and you have all the possible information available to you. The problems and loss of information caused by IPv4 NAT are avoided wherever possible.
The drawback is that you will need to implement IPv6 everywhere. There might be existing hardware or software that is not IPv6 compatible. These components will have to be upgraded or replaced, which will probably take money and effort.
If this option is available to you then it offers the best performance and most possibilities.
5. Implementing IPv6-to-IPv4 proxy
5.1. Preparation
When implementing native IPv6 is not possible then using reverse proxy servers to make services available over IPv6 is the second best option. When choosing this option the major choices are on which protocol level to implement it and where to place the proxy.
Using a layer 4 proxy is the easiest. It doesn’t require any knowledge on the proxy server other than the addresses and port numbers. The downside is that it is not possible for example to add extra headers to an HTTP or HTTPS request to make the IPv6 address of the client known to the web server.
Using a layer 7 proxy provides more flexibility because that makes it possible for the proxy to add information to the request sent to the server. The downside is that the proxy server needs to know about every website that it should proxy and it must have all the SSL/TLS keys and certificates for any HTTPS websites. If including an X-Forwarded-For header the load balancers, web servers, application server software and supporting software might need to deal with IPv6 addresses in that header, so check if that is the case.
When deciding on the location of the proxy server the first step is to decide on whether to host the proxy server internally or externally. When the proxy server is hosted internally then at least part of the internal network has to be IPv6 enabled. When using an external proxy server, for example by letting the service provider provide one, then the internal network does not need to change. Then using an internal proxy server then the best place for that server is behind the firewall and before the load balancer, if possible.
5.2. Technical overview
We will give a few simple examples of how a reverse proxy server can be configured. These examples are based on the haproxy software as it can be used both as a layer 4 and 7 proxy.
5.3. TCP (layer 4) proxies
In this example we use these addresses and ports:
- The IPv4 address and port of the real web server:
192.0.2.1 on TCP port 80 - The IPv6 address and port that the proxy server listens on:
2001:db8:abc:123::cafe on TCP port 80
A basic haproxy configuration on port 80 for HTTP traffic can look like this:
global user haproxy group haproxy daemon log /dev/log daemon defaults timeout client 5000 timeout connect 5000 timeout server 10000 listen webserver1 bind 2001:db8:abc:123::cafe:80 mode tcp server webserver1 192.0.2.1:80
This technology works for any TCP port, so it can be used for protocols like SMTP as well. In this example we use these addresses and ports:
- The IPv4 address and port of the real SMTP server:
192.0.2.1 on TCP port 25 - The IPv6 address and port that the proxy server listens on:
2001:db8:abc:123::cafe on TCP port 25
The last part of the configuration then looks like:
listen smtp1 bind 2001:db8:abc:123::cafe:25 mode tcp server smtp1 192.0.2.1:25
5.4. HTTP (layer 7) proxies
In this example we use these addresses and ports:
- The IPv4 address and port of the real web server:
192.0.2.1 on TCP port 80 - The IPv6 address and port that the proxy server listens on:
2001:db8:abc:123::cafe on TCP port 80
Using haproxy for HTTP is very similar to the layer 4 example above. Only the listen section needs to be changed to switch to HTTP mode and include the X-Forwarded-For header:
listen website1 bind 2001:db8:abc:123::cafe:80 mode http option forwardfor server website1 192.0.2.1:80<p/pre>
5.5. HTTPS (layer 7) proxies
In these examples we use these addresses and ports:
- The IPv4 address and port of the real web server:
192.0.2.1 on TCP port 443 - The IPv6 address and port that the proxy server listens on:
2001:db8:abc:123::cafe on TCP port 443
When using haproxy as a layer 7 proxy with SSL/TLS then haproxy needs access to the private key and the corresponding certificate for that website. Both the key and the certificate need to be in one PEM encoded file. The following example shows the listen part:
listen website1-ssl bind 2001:db8:abc:123::cafe:443 ssl crt /etc/haproxy/website-ssl.pem mode http option forwardfor server website1 192.0.2.1:443 ssl
This example accepts connections over SSL/TLS, adds the X-Forwarded-For header to the request and then forwards it over SSL/TLS to the IPv4 server.
An alternative approach when it is not possible or desirable to have the private key on the proxy server is to treat SSL/TLS connections as regular TCP connections. The proxy server will only see the encrypted traffic, so it will not be possible to add the X-Forwarded-For header to the request.
listen website1-ssl-passthrough bind 2001:db8:abc:123::cafe:443 mode tcp server website1 192.0.2.1:443
5.6. Benefits and drawbacks of this solution
The major benefit of this solution is that not all parts of the network need to be IPv6 enabled. Certain problems caused by IPv4 NAT can be mitigated. It is for example possible to implement access control and rate limiting on a proxy server. The logs on the proxy server can also be used for security and auditing. Depending on whether or not the X-Forwarded-For header is added to the request by the proxy server the IPv6 address of the client can also be used on the servers for these purposes as well as for example behaviour analysis and geo-location.
The downside of this approach is that it adds an extra network element for IPv6 traffic, which can make monitoring, debugging and system and network administration more complex.
6. Implementing NAT64
6.1. Preparation
The choice for using NAT64 is usually because a device such as a firewall already offers this possibility. Otherwise using a reverse proxy as described above is easier and less error prone.
6.2. Technical overview
In these examples we use these addresses and ports:
- The IPv4 address of the real server:
192.0.2.1 - The IPv6 address that the proxy server listens on:
2001:db8:abc:123::cafe
NAT64 maps the whole IPv6 address to an IPv4 address, so it applies to all protocols and ports.
In this example we will use a Juniper SRX series firewall as the NAT64 gateway. First the firewall must be told which IPv4 address to forward the traffic to:
root# set security nat destination pool server1 address 192.0.2.1/32
Now we need to map the traffic sent to the IPv6 address to this IPv4 address:
root# top root# edit security nat destination rule-set server1-dest root# set from zone untrust root# set rule rule-1 match destination-address 2001:db8:abc:123::cafe/128 root# set rule rule-1 then destination-nat pool server1
With only this configuration the packet is in an invalid state. The source address of the packet is still an IPv6 address while we changed the destination address to an IPv4 address. Packets can either be completely IPv4 or completely IPv6, but not mixed. So now we need to change the source address of the packet to IPv4 as well. We’ll use the IPv4 interface address of the firewall as the new source address:
root# top root# edit security nat source rule-set server1-source root# set from zone untrust root# set to zone untrust root# set rule rule-2 match source-address 0::/0 root# set rule rule-2 match destination-address 192.0.2.1/32 root# set rule rule-2 then source-nat interface
Now the server needs to be adjusted so that it only sends IPv4 packets with a maximum size of 1260 bytes. How this is done depends on the server operating system, but usually an MTU option can be found in the network adapter settings.
6.3. Benefits and drawbacks of this solution
A major drawback of this approach is that it requires changes in the IPv4 behaviour of the servers. They must be configured with a smaller MTU, which will affect all IPv4 traffic. If an existing device already offers NAT64 it can be a fast way to deploy IPv6 though, and it has been used as such by several organisations.
7. Advice for service providers
Many organisations will need to deploy IPv6 to some extent and many services will need to become IPv6 enabled. Service providers should offer services to assist their customers with the transition to IPv6.
Most important is making IPv6 connectivity available to their customers. Organizations need to be able to connect to the IPv6 internet to get experience, monitor their IPv6 services and in the future for connecting to IPv6-only services.
Those organisations will also have to IPv6 enable their own services for their users. The best option is for every organisation to fully deploy IPv6 in their own networks, but this is often not a reasonable short term option. Service providers should offer reverse proxy based services to their customers so they can make their services and content available over IPv6 without making any changes to their own infrastructure.
Service providers also have the knowledge and experience to make such reverse proxy service robust, reliable and well performing. While providing such proxy services is a temporary solution, it will be a solution that will be usable in many years to come.
In the future a similar service might well be the only way to make IPv6 services hosted by the customer available over IPv4.